Detailed Notes on wiring a pendant light
Wiki Article
We have stumbled upon this post on install ceiling light directly below on the net and decided it made good sense to discuss it with you on my blog.
You'll often see us refer to 2-wire and 3-wire illumination systems. This is an important factor as several products, such as relays, can not function if installed right into a 2-wire system.
This application note describes the difference in between 2-wire as well as 3-wire lights systems and aids you understand which variation you have in your installation.
To start with, what do we mean by 2-wire and also 3-wire systems. The easy description is that a 2-wire system does not include a Neutral cable at the light switch, the 3-wire system does consist of the Neutral at the switch.
2-wire Lighting Equipments
This is one of the most typical illumination system in Europe, nearly all houses use this system, particularly in the UK as well as Nordic regions.
The term is somewhat confusing as the system will actually include three wires. Nonetheless, the 3rd wire, which typically has a green/yellow sleeve is the Earth wire. The Earth is an extremely integral part of the electric system and all switches, appliances and lights must be correctly earthed. But also for the sake of simplicity we ignore the Planet cord when describing electrical wiring as it plays no active function in the day-to-day operations of your light circuits.

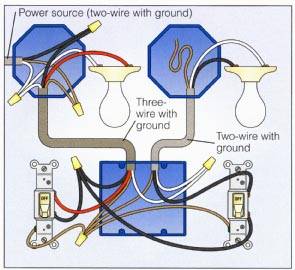
3-wire Lighting Solutions
The 3-wire system is much less usual than the 2-wire system, it consists of a Neutral at the switch along with the Live and also Switched Live wires.
An instance of a 3-wire lights circuit is shown in Figure 2. One '2-Core + Earth' wire takes Live as well as Neutral to the button back box, a 2nd wire takes the Neutral and Switched Live to the light.
Keep in mind - the Neutral is not connected to the actual button, both Neutrals are linked with each other utilizing a port block.
Just how do I know which system I have?
As the 2-wire system is the most usual, it's probably best to start with the presumption that you have a 2-wire system, especially if you remain in the UK or if your home is greater than 3-5 years old.
You can check the following points:
• Are all the cables linked to the button?
• Do all the cords have a brown sleeve on them?
• If the answer is YES to either of these points, you have a 2-wire system
• Do you have two blue, black or grey cords going to a port block? If so you MAY have a 3-wire system, however you must confirm this with a voltage meter or get in touch with a certified electrical expert.
A Word of Care
Shut down the breaker controlling the light as well as follower circuit. This is the solitary crucial part of any type of home wiring procedure. Also after turning off the breaker, it's still a great idea to make use of a voltage tester to test the cable links before you deal with them.
You'll Need to Make Pigtails
In electrical work, a pigtail is a collection of wires mated together with a brief size of wire. The pigtail allows you to attach all the wires to a single terminal. The secret to making an effective one is to twist the cords together clockwise-- not counterclockwise-- before screwing on the cap. That way, the clockwise threads of the cap make the connection tighter when you screw it on.
Converting From Two Switches in the Same Box to One Switch Over
Separate the two black cords from both switches. If you do not recognize which one materials power to every switch, transform the power back on as well as examine the cables by attaching each to ground with your voltage tester. The live circuit cords will certainly offer you an analysis as well as the others won't. Turn the breaker withdraw when you understand which is which.
Make a pigtail with both live wires and also a short size of black cable of the very same scale. Attach the short cord to the top terminal of the button you wish to use. Do the exact same with the two other cords, and connect them to the bottom terminal of the button.
Loosen the cap from both white wires offering the switch you're no more using, include a short length of white wire of the same gauge as well as screw the cap back on to make a pigtail. You might require a bigger cap than the one that got on there. Splice the various other end of the brief cable to both white cables offering the brand-new button. If you desire, you can also merely splice all four white cables together under the same cap, yet you might find that hard to do with four cables.
Get rid of the ground from the out-of-service button and the one from the switch you're making use of. Link them by turning them together or making use of a kink ring, then affix them to the environment-friendly ground terminal on the button you're making use of.
Linking a Light and also Follower to a New Switch
Situate the switch wire, which should be sticking via the leading or side of the box serving the follower or light. Utilizing cord pole dancers, strip an inch of insulation from completion of the black and white wires. Interlace the black cable from the fan along with the black wire from the light and also the black wire from the button, and cap them. Connect the white wires with each other similarly, then repeat with the ground cords. When you splice ground cords, you don't need to cap them, but it's still a great concept to do so due to the fact that the cap assists maintain them together. Mount the fan and light and relocate to the switch box.
Link the black cord from the fan down terminal of the switch and the online circuit cable to the leading terminal. Interlace the white cords with each other as well as cover them. Twist the ground wires with each other and also connect them to the eco-friendly ground screw on the button.
As a devoted reader on wiring a ceiling light with 2 wire, I think sharing that piece of content was a good idea. Sharing is nice. You won't know, you may be helping someone install ceiling light out. I thank you for reading our article about wiring a ceiling light.
Even so, When you have an older household which was inbuilt the early 80s, you could possibly very perfectly have wiring for fixtures which are rated at a decreased temperature location. This could generate a difficulty Because the much more modern-day fixtures need the usage of wires which can hold up beneath hotter temperatures.
Australia's historical coloration for neutral is black. (Next United kingdom's lead for black=neutral pink=sizzling, a convention however utilised most areas for DC electrical power). The new four-continent regular for neutral is light blue. So It is easy to find out by context that the legacy Australian wiring has black as neutral, as well as your present day earth-marketplace lamp has blue as neutral.
The wires that stay within ceiling admirer are really uncomplicated. But when you need to operate with them to connect the proper way, it’s crucial to understand what each one is.
We enjoy opinions on our DIY tutorials it can help us to create them the ideal they perhaps is usually so if you have any comments you want to to share with us, click on the button beneath and let us know.
Patch up the wall in which your temporary hole was Slice in. Now you can switch your energy on and examination the light.
We requested the usage of a few image. Now the editor wishes to exchange among the photographs with a picture of your house that we observed on the positioning. Be sure to shoot me an e-mail and Enable know if it is okay to use this picture: Otherwise no anxieties!!!! Just let me know right now if at all possible.
Even so, once the light has been configured to generally be managed with a independent swap, it is possible to choose to hire the usage of a dimmer swap to lessen the depth of your light.
Following, you ought to Test if your light package is triggering any troubles. It’s attainable among its wires is now frayed or loose, blocking energy from achieving your admirer effectively.
A rattling audio within an LED bulb would reveal that an inside part on the bulb has broken no cost. Since these components are critical for a performing LED bulb, rattling will normally suggest a LED bulb that now not is effective.
But what if you need to wire a ceiling light which has a admirer connected? You have got to come up with a couple changes to your technique. Here's how to get it done.
You’ve possibly recognized that ceiling fixtures can be found in many alternative models and styles. Equally as their seems to be change, so do the procedures persons make use of to attach them for the ceiling.
Obtain your lovely helper to carry the rest of the fixture so that you can concentrate completely on connecting the wires. When performed, you have got to tuck the wires into your electrical box.
The simplest way to try this is by building all existing connections into cable connectors (bare minimum five amp) or perhaps a junction box, as demonstrated down below. The Reside cables will probably be joined because they were being within the ceiling rose, as will the neutrals, And at last, but incredibly importantly, the earths.
The Dwell terminal is fed from The buyer unit and consequently offers live electricity to the opposite cables during the circuit, in this case cable one materials the Are living power in the source or previous light, exactly where it really is taken by cables 2 and three.